Sensitivity Label Best Practices – Keep the Taxonomy Simple and Let Microsoft Purview Do the Work
In my previous blog post, Microsoft Information Protection Best Practices, I wrote about why organizations need to improve how important and sensitive information is protected in Microsoft 365 and beyond. That post focused on broader information protection challenges: inconsistent classification, incorrect labels, suboptimal protection settings, interoperability issues, and the need to simplify security classification models so users and systems can classify information correctly.
This post goes one level deeper. It focuses specifically on sensitivity label design best practices in Microsoft Purview.
Many organizations over-design sensitivity labels. They add a label for every business unit, every exception, every external sharing scenario, every level of confidentiality, and every perceived protection requirement. The result is often a taxonomy that looks precise in a workshop but fails in practice because users do not understand it, automation cannot reliably apply it, and support teams inherit the complexity.
A better approach is to keep the label model simple, make the Confidential category expandable with sub-labels, use Microsoft Purview DLP and auto-labeling to support users and enforce controls, and use Microsoft Purview Insider Risk Management to detect risky behaviors, data leakage, and data theft.
1. Start with a simple classification model
A good label taxonomy should help users answer one question: How sensitive is this information?
It should not force users to answer every possible access, sharing, encryption, recipient, and exception question at the point of labeling.
Microsoft Purview sensitivity labels can classify and protect data across Microsoft 365, and labels are published to users through label policies. Labels can also include protection settings such as encryption and content markings. However, that the main value of sensitivity labels is tag sensitive data that needs to be protected with Purview DLP and Insider Risk Management.
A recommended model is:
- Public
- Internal
- Confidential
– Confidential Unprotected
– Confidential Protected
This gives users three main classification concepts:
- Public: approved for public release
- Internal: business information not intended for public release
- Confidential: sensitive business information requiring additional care
The Confidential concept then has two practical labels: Confidential Unprotected and Confidential Protected. In Microsoft Purview, Confidential should be implemented as a label group. The group itself cannot be published or applied; users select one of the labels within it. This keeps the classification model simple while still allowing different protection behavior for confidential information.
2. Consider avoiding a four-level model with both Confidential and Top Secret for all users
Many organizations are tempted to implement four or more top-level classifications, for example:
- Public
- Internal
- Confidential
- Top Secret
On paper, this looks more precise. In practice, it often creates a user-behavior problem.
In many organizations, most users can distinguish between Public, Internal, and Confidential. Far fewer can reliably distinguish between Confidential and Top Secret in day-to-day work. When users are unsure, they often choose the higher label “just to be safe.” This leads to over-classification.
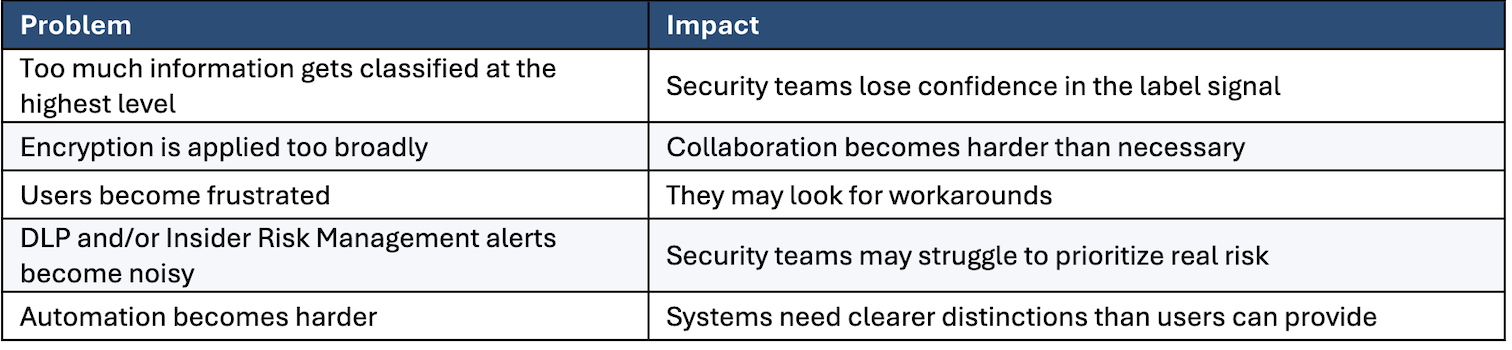
A better design is to keep Confidential as the top sensitivity category for most business content and use sub-labels to define whether that confidential information is protected or unprotected.
In other words, do not force most users to decide whether something is Confidential or Top Secret unless the organization has a very strong and clearly understood reason for that distinction.
Top Secret recommendation: If a Top Secret label is genuinely required, it should be treated as a restricted specialist label, not a general classification option.
A Top Secret label should normally be:
- available only to users who have the required clearance, role, and business need to work with Top Secret information;
- published through a separate scoped label policy to the relevant users or groups;
- supported by specific training and handling guidance;
- protected by strong default controls, such as encryption and restricted sharing;
- monitored for downgrade, sharing, and exfiltration risks;
- governed through a clearly defined approval and exception process.
Microsoft’s label publishing model supports selecting users and groups for labels and label policy settings. This controls who can select and apply a label; it does not by itself grant access to labeled content. A sensitive label can therefore be published only to a restricted population rather than broadly to everyone.
For most users, the recommended model should remain:
- Public
- Internal
- Confidential
– Confidential Unprotected
– Confidential Protected
For a small cleared population, an additional restricted label may be published:
Top Secret
The important design principle is that Top Secret should not be a normal label available for everyone to select. Publish it only to users who are authorized and expected to work with that level of information and configure encryption and access controls separately. Best practice for Top Secret is that the same users that can use the label also can access the content. This means that if a user finds a Top-secret file and is not approved to access this information, then they will be blocked from opening the file.
3. Use Confidential as an expandable group
The recommended model is:
- Public
- Internal
- Confidential
– Confidential Unprotected
– Confidential Protected
In modern Microsoft Purview tenants, Confidential should normally be implemented as a label group containing usable labels such as Confidential Unprotected and Confidential Protected. A label group organizes labels but cannot itself be published or applied. This structure also provides a controlled way to add future labels when there is a genuine requirement for different controls or governance.

Design rule: Add a new sub-label only when unique encryption or content marking is required. Do not add sub-labels just to classify different types of sensitive data such as privacy data, market sensitive data, intellectual property, etc. Classification and monitoring can still be done with the use of SITs without creating a more complex user experience
4. Recommended label behavior
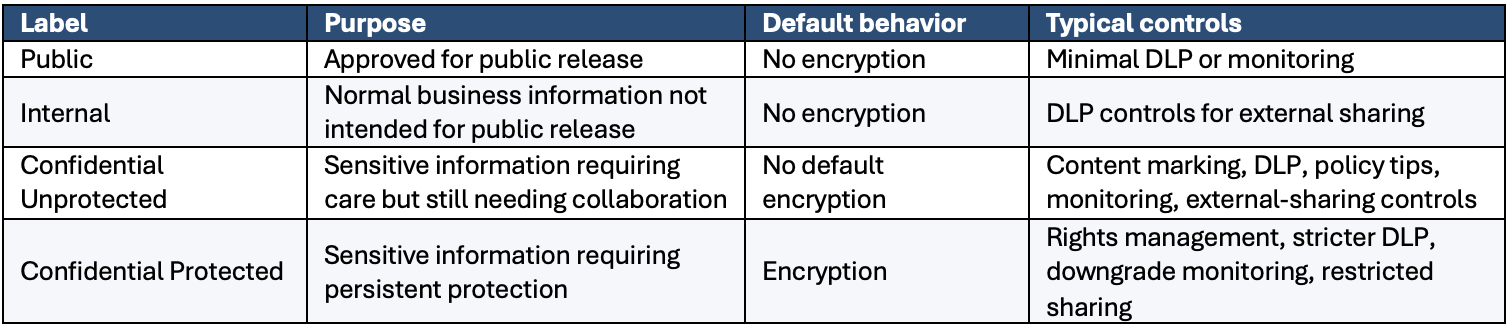
This makes the model easier for users: Public means the information is approved for public release and may be shared externally in accordance with the organization’s sharing policies. Internal means it is business information, not public. Confidential means it is sensitive. Confidential Protected means it is sensitive and must remain technically protected.
Be careful with content marking as it might conflict with corporate templates for PowerPoint, Word, etc. If this is an issue feel free to avoid content marking as the labels themself will be visible in the clients for internal employees.
5. Use DLP to protect Internal information when risk changes
Internal information is not public, but that does not mean all Internal information should be encrypted by default. A more practical approach is to let Internal information remain usable inside the organization, then use DLP when the information is shared externally or used in risky ways.
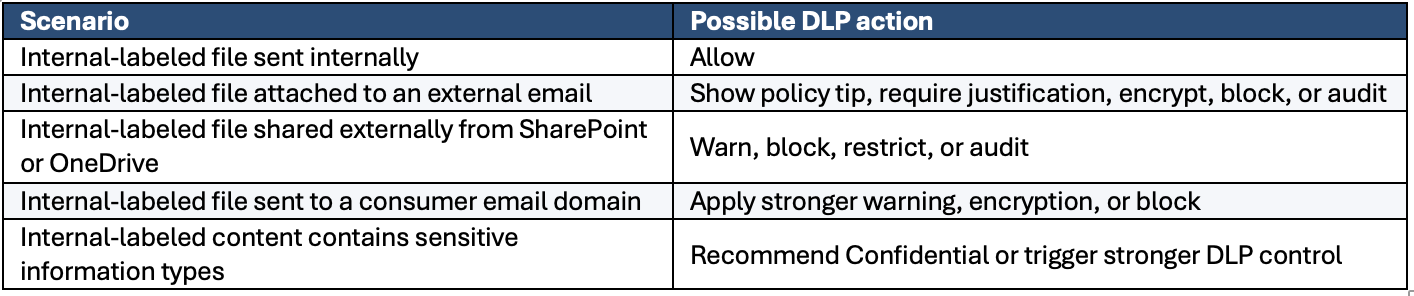
This is the core design pattern:
Label = What is the information?
DLP = What is happening to it?
Context = Where is it going, who is involved, and how risky is the action?
Action = Allow, warn, block, encrypt, audit, or escalate.
6. Use DLP policy tips to help users classify sensitive content
DLP policy tips are not only an enforcement mechanism. They are also one of the most effective ways to educate users at the point of risk.
If a user is writing an email, attaching a document, or sharing a file that contains sensitive information, a policy tip can tell the user what is happening and guide them to classify or handle the content correctly.
DLP policy tips can be based on signals such as Sensitive Information Types, custom Sensitive Information Types, exact data match, keywords and phrases, subject or body text, existing sensitivity labels, sender or recipient conditions, and external sharing context. Available conditions and policy-tip experiences vary by workload, application, and licensing.
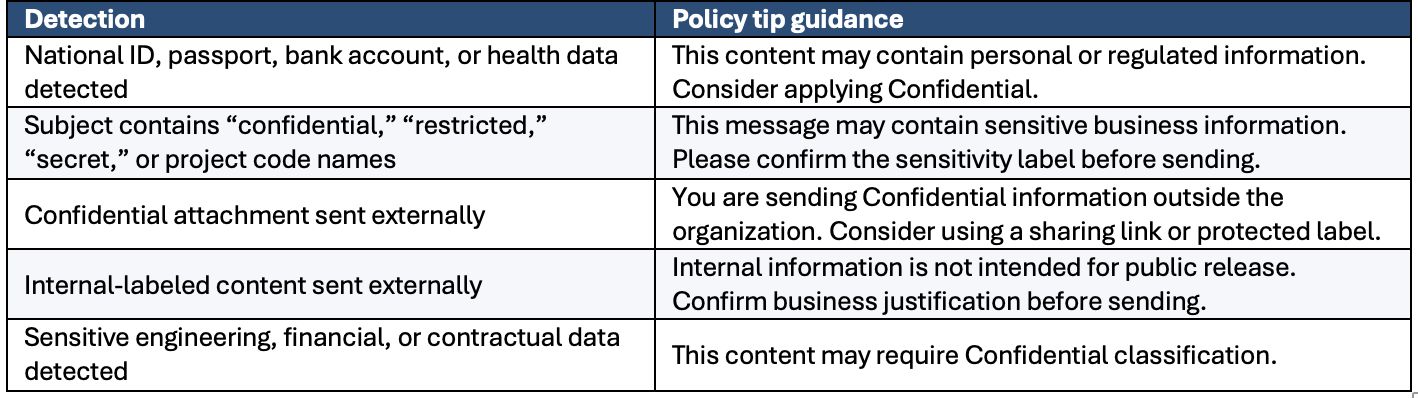
This is powerful because it helps users classify content when they are actually handling the sensitive information, not weeks earlier in a training session.
7. Auto-labeling should be designed into the taxonomy
Auto-labeling should not be an afterthought. The taxonomy should be designed so labels can be applied or recommended automatically where the signal is strong enough.
Microsoft documents two automatic labeling methods in Microsoft 365: client-side labeling when users edit documents or compose emails in Office apps, and service-side labeling for content already saved in SharePoint or OneDrive or processed by Exchange Online. Automatic labeling can apply sensitivity labels when content matches specified conditions, reducing reliance on users classifying all content correctly.
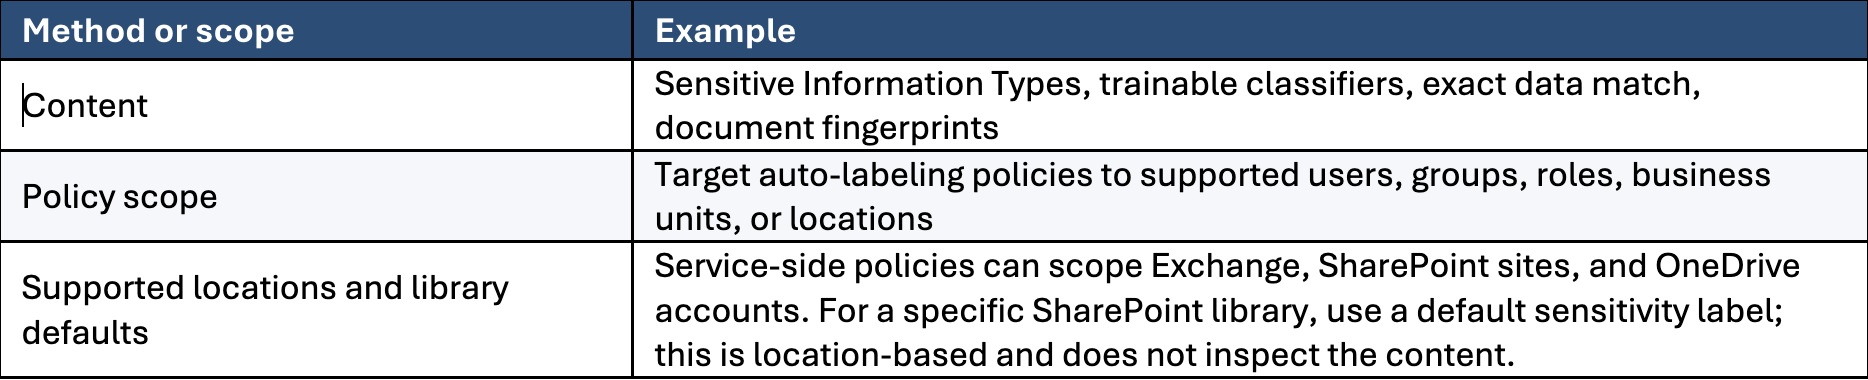
The key is to avoid label designs that depend on custom user-selected permissions. Auto-labeling can classify content as Confidential Unprotected or Confidential Protected. It usually cannot reliably determine the exact custom list of individuals who should have rights to every individual file.
8. Avoid custom permissions as the default
Custom permissions can look attractive because they allow users to decide exactly who can access a file. But they are usually a poor default pattern for enterprise-scale sensitivity labeling.
They are difficult to govern centrally, make auto-labeling harder, depend on users making correct access decisions, create access problems when document owners leave, increase support tickets, make reporting and troubleshooting harder, and can result in files nobody can access later.
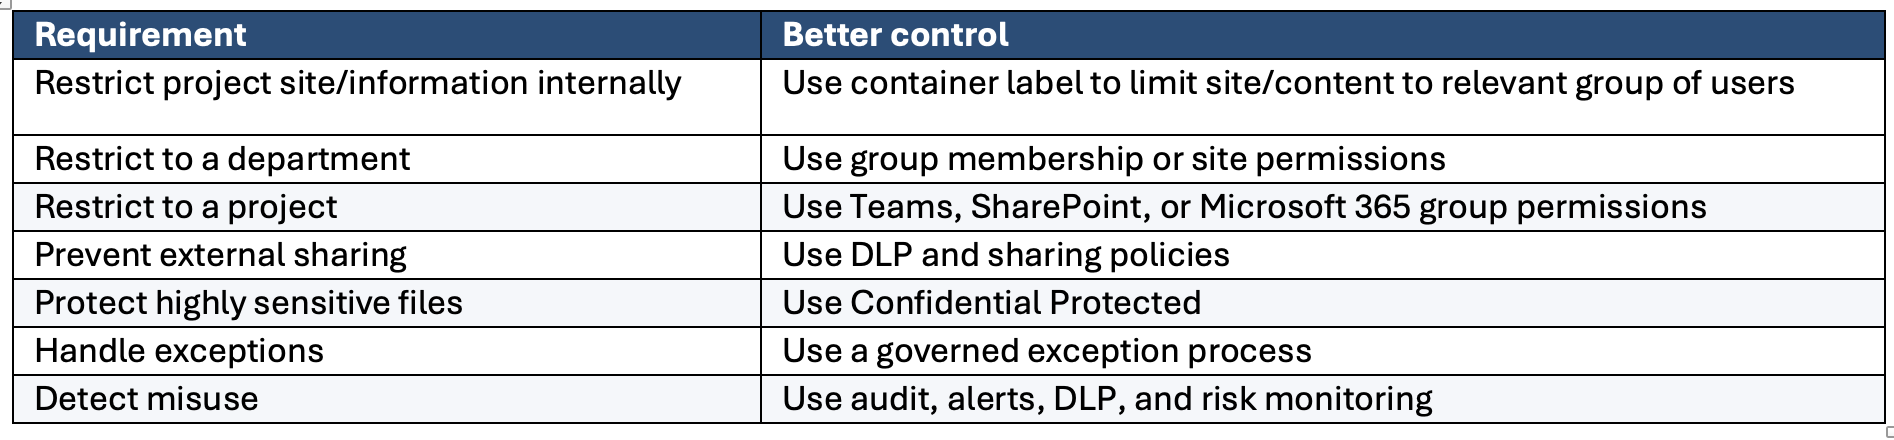
The label should classify the content. Access should normally be managed through groups, sites, teams,
business roles, and governance processes.
9. Scope mandatory labeling carefully
Mandatory labeling can improve classification coverage, but it should be introduced carefully. Microsoft label policies can be assigned to selected users and groups, and different policies can be used when users need different labels or different policy settings. That means mandatory labeling can be scoped and does not need to be introduced as a blanket tenant–wide control from day one.
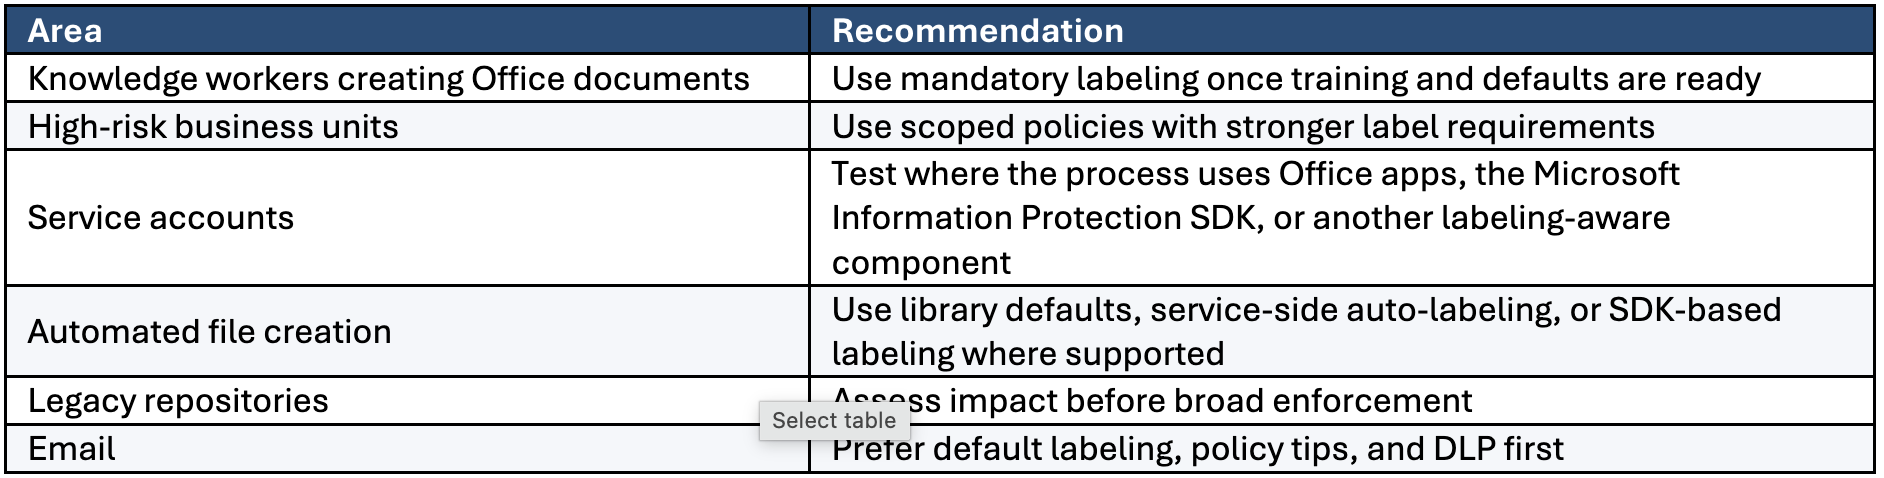
Mandatory labeling primarily affects assigned users in supported Office applications when they open, edit, save, or send unlabeled content. It does not universally prompt or block service accounts, integrations, or non–interactive uploads. Assess automations that use Office applications, the Microsoft Information Protection SDK, or other labeling–aware processes before broad deployment. As it is impossible to assess all automations before go–live, it is good to plan for an “opt–out” or rollback for affected if issues are reported
10. Email needs a different design pattern
Email should not be treated exactly like documents. Documents are stored, edited, shared, reused, andgoverned over time. Email is conversational, high–volume, and frequently external. A practical email model is:
1. Apply a default email label for normal business email.
2. Avoid encrypting all externally sent email by default
3. Where configured and supported, let sensitive attachments influence email protection.
4. Provide label recommendations to users when sensitive data is discovered
5. Use DLP and auto-labeling for sensitive information in the email body.
6. Reserve encryption for Confidential Protected or specific DLP-triggered events.
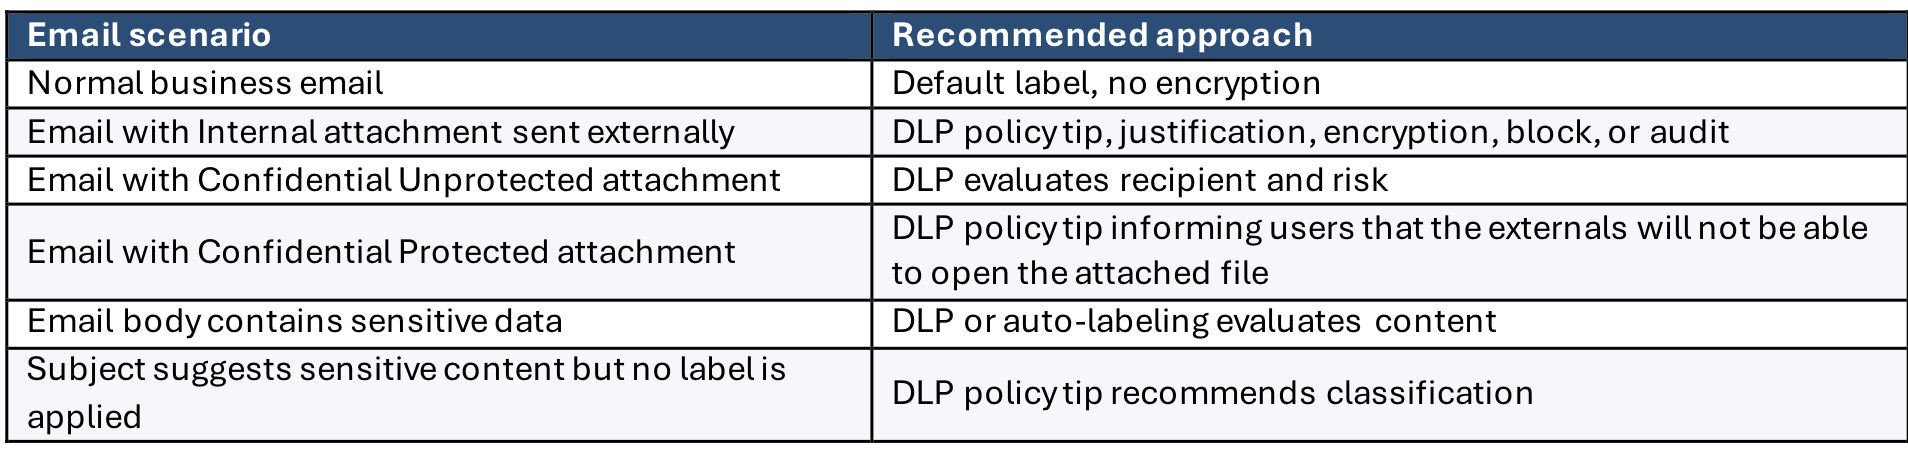
This approach makes email labeling practical while still protecting sensitive content when risk increases.
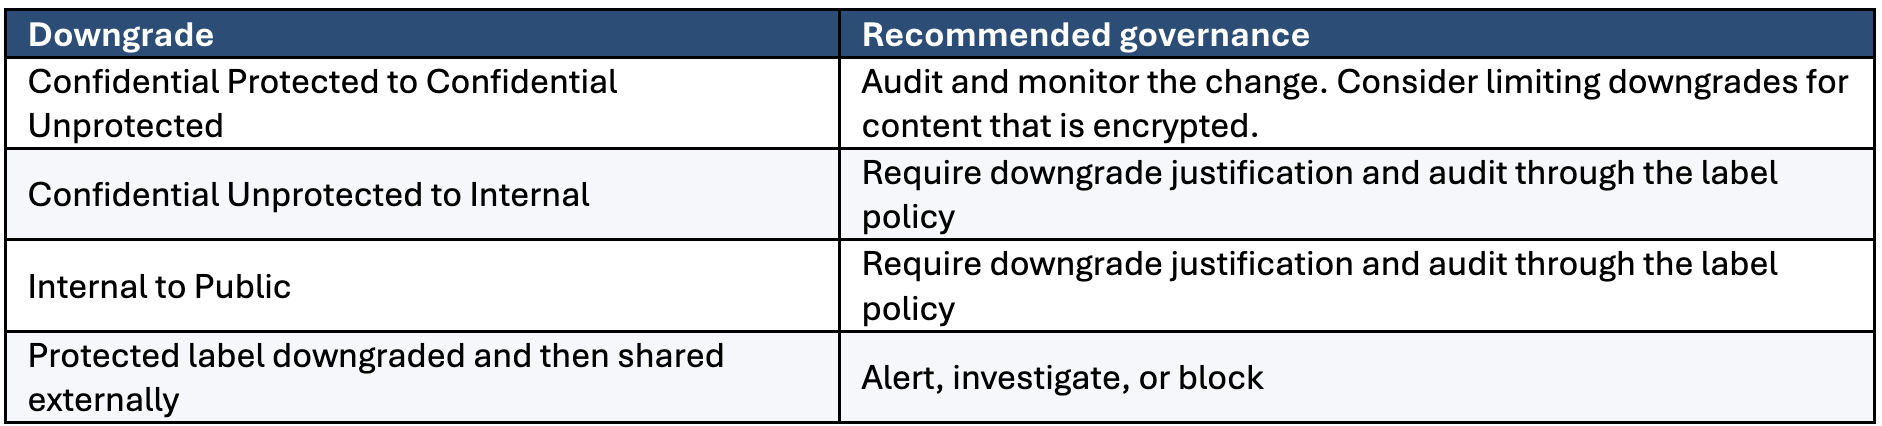
11. Downgrade governance is essential
A simple label model still needs strong downgrade governance. The most important risk is not only that users select the wrong label initially, but also that sensitive content is deliberately or accidentally moved to a lower classification before being shared. Microsoft Purview can require justification when users change to a lower – priority label. It can also limit downgrades if content is encrypted
12. Final recommendation
The best sensitivity label design is not the one with the most labels. It is the one users can understand, automation can apply, security teams can govern, and the business can live with. For many organizations, the recommended model is:
- Public
- Internal
- Confidential
– Confidential Unprotected
– Confidential Protected
• Use Public, Internal, and Confidential as the main user concepts, with Confidential implemented as a
label group.
• Use Confidential Unprotected for sensitive information that needs collaboration.
• Use Confidential Protected for sensitive information requiring encryption.
• Use DLP policy tips to guide users when SITs, labels, or sharing context indicate sensitive content.
• Use DLP enforcement to protect Internal and Confidential information when it is shared externally or
used in risky ways.
• Use auto–labeling based on supported content signals, and scope policies to supported users, groups,
and locations. Use SharePoint library default labels for location –based defaults.
• Avoid custom permissions as the default pattern.
• Scope mandatory labeling carefully using label policies.
• Make Top Secret selectable only by cleared and authorized users if it is needed.
• Add new Confidential sub–labels only when there is clear evidence that the use case needs different
controls.
References and source notes
These references were used to ground the technical recommendations and provide useful background for
review:
• Microsoft Information Protection Best Practices | Infotechtion
• Create and publish sensitivity labels | Microsoft Learn
• Default sensitivity labels and policies to protect your data | Microsoft Learn
• Automatically apply a sensitivity label to Microsoft 365 data | Microsoft Learn
• Data Loss Prevention policy tips reference | Microsoft Learn
• Migrate parent sensitivity labels to sensitivity label groups | Microsoft Learn
• Require users to apply a sensitivity label to email and documents | Microsoft Learn
• Apply a default sensitivity label to a SharePoint document library | Microsoft Learn
• Manage sensitivity labels in Office apps | Microsoft Learn
Extend sensitivity labeling beyond the Microsoft cloud
Infotechtion Sensitive Data Discovery extends this classification approach across the wider enterprise data estate. It discovers, maps, and classifies sensitive information across cloud and on –premises sources, integrates with Microsoft Purview sensitivity labels and Sensitive Information Types, and provides a continuous view of sensitive–data and AI risk. This helps organizations identify dark data, prioritize remediation, and apply more consistent protection wherever information resides.